- September 22, 2022
- Posted by: Mahesh S
- Category: Engineering

All of us have heard about Blockchains, Web 3, Decentralized Apps etc. and that these are gonna be the future of Internet, it’s a game changer, etc.
Is this for real? Or, are all these proclamations just a matter of hype? Let’s find that out along with creating a sample web3 app!
First, let’s see the helicopter view of a Web 3 Decentralized app:
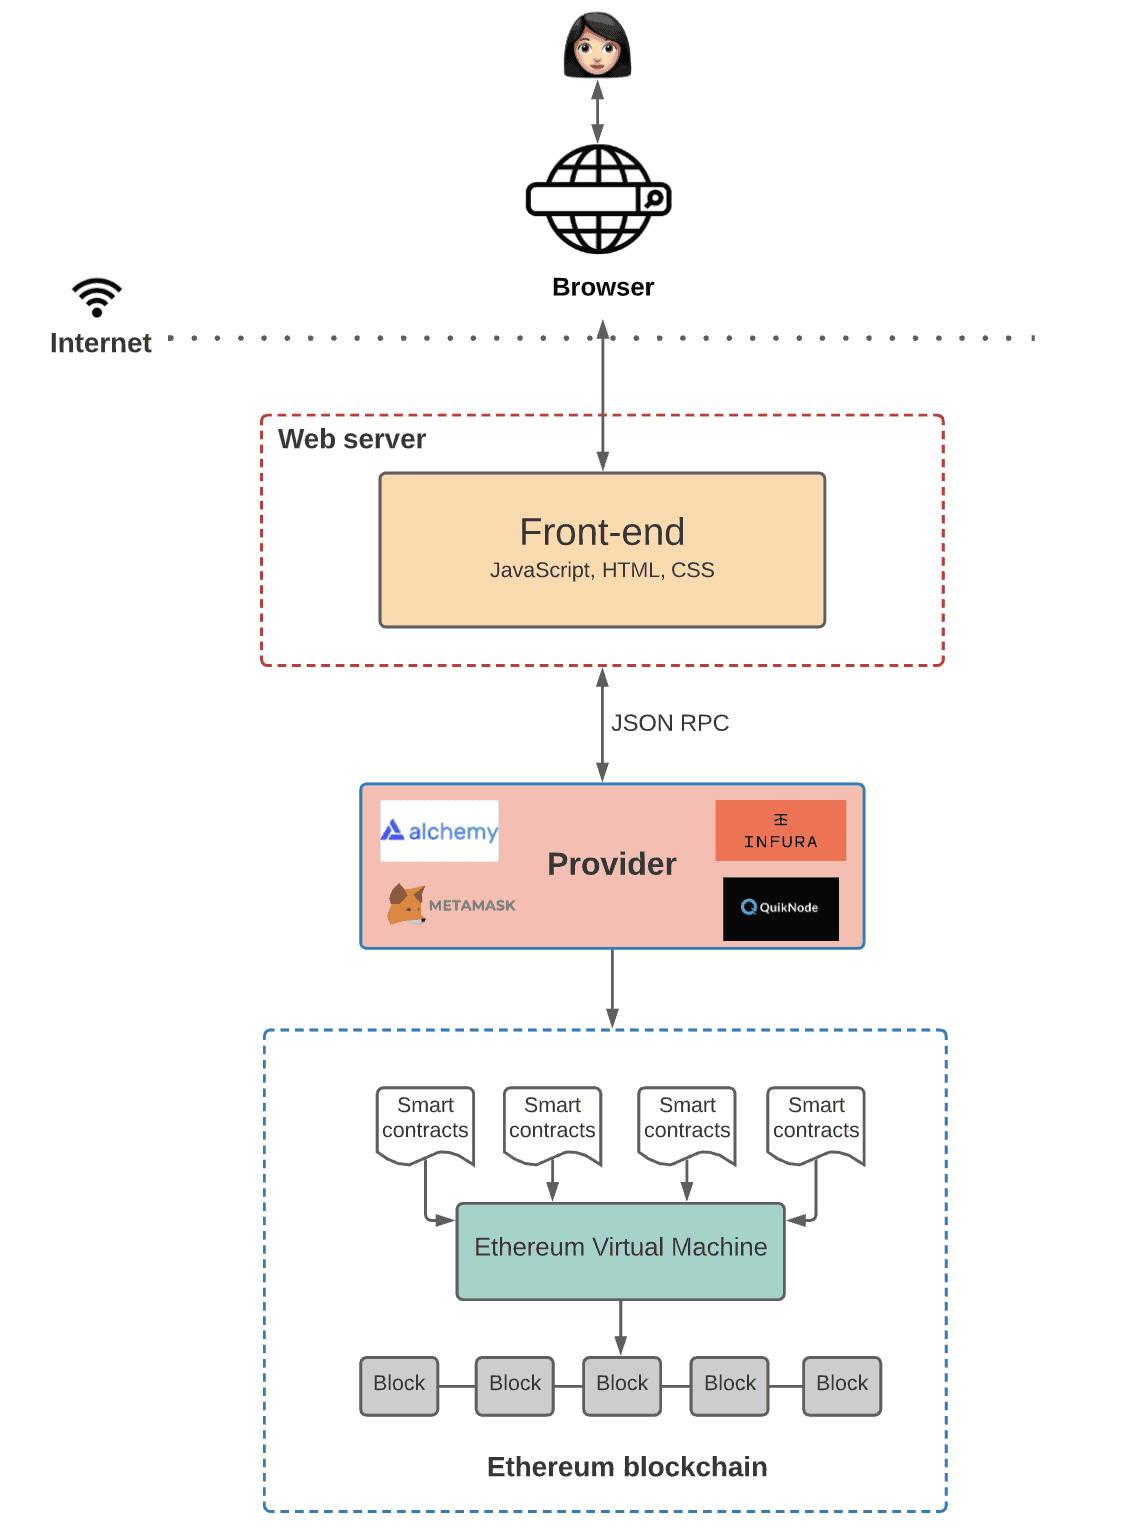
Before digging deeper, let’s quickly explore some concepts of Blockchain networks.
Main Concepts
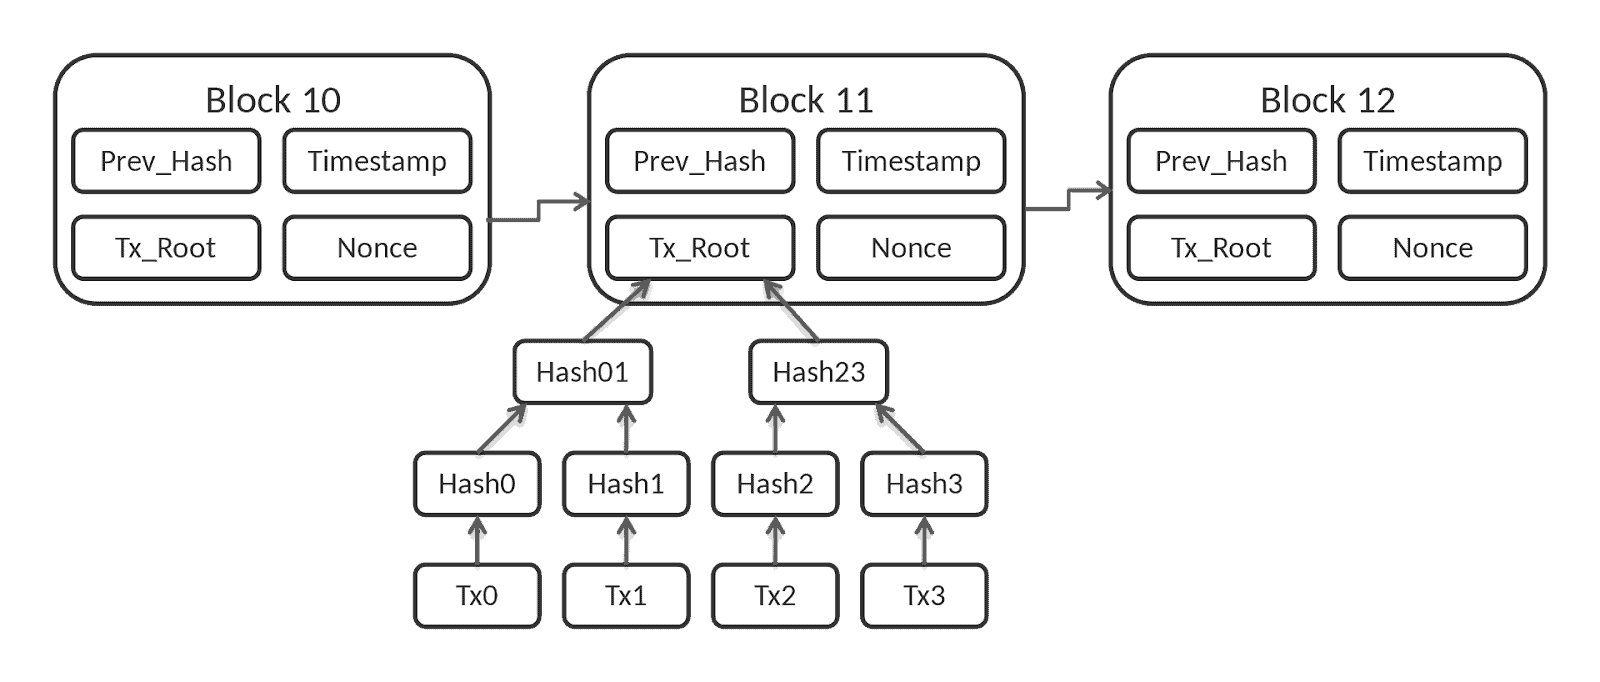
- A Blockchain is a type of Digital Ledger Technology (DLT) that consists of growing list of records, called blocks, that are securely linked together using cryptography.
- Each block contains a cryptographic hash of the previous block, a timestamp, and transaction data (generally represented as a Merkle tree, where data nodes are represented by leafs).
- The timestamp proves that the transaction data existed when the block was created.
- Since each block contains information about the block previous to it, they effectively form a chain (compare linked list data structure), with each additional block linking to the ones before it.
- Consequently, blockchain transactions are irreversible in that, once they are recorded, the data in any given block cannot be altered retroactively without altering all subsequent blocks.
Our findings
- The data once entered into the blockchain is unalterable – which means that the version history of the data is preserved.
- You can make changes to the data, but only in the form of a new block in the chain, and the historical data(the previous versions) will always be existing in the network as previous blocks.
- Since the ledger is synced to each node of the Blockchain network, even if one node is removed, all the other nodes will still have it – which is why it’s called “decentralized” with no central authority owning and keeping all the data.
- Since there’s no central authority, the data is owned by the people who create it – which means our data has no dependency on any third-party services/organizations and is completely independent of their existence.
Now you might have understood why it’s quite obvious that Web 3 is called the future of the Internet.
Now, let’s create a sample Web 3 application
We’re now gonna develop a basic Web3 dApp which uses the Ethereum Blockchain.
This is a basic Election app where there can be any number of Candidates added and the users can vote and elect a Candidate.
Core technical concepts in this example
- Users are authorized/identified with their Account ID(through MetaMask).
- Data Structures/Models are defined in Smart Contracts(via the Solidity language).
- Web3.js is used to communicate with the Ethereum node and retrieve/update data in in the Blockchain.
Development Tools
- Node Package Manager (NPM) – For setting up the frontend Webapp.
- Truffle Suite – Provides us the development environment for the dApp.
- Truffle Ganache – Sets up a sample Blockchain network with 10 accounts having 100 ETH coins each.
- MetaMask – This is the Wallet used to interact with the Ethereum blockchain. It allows users to access their Ethereum wallet through a browser extension or mobile app, which can then be used to interact with decentralized applications
Breif Workflow
Backend
Open Ganache. You should see a window like below:
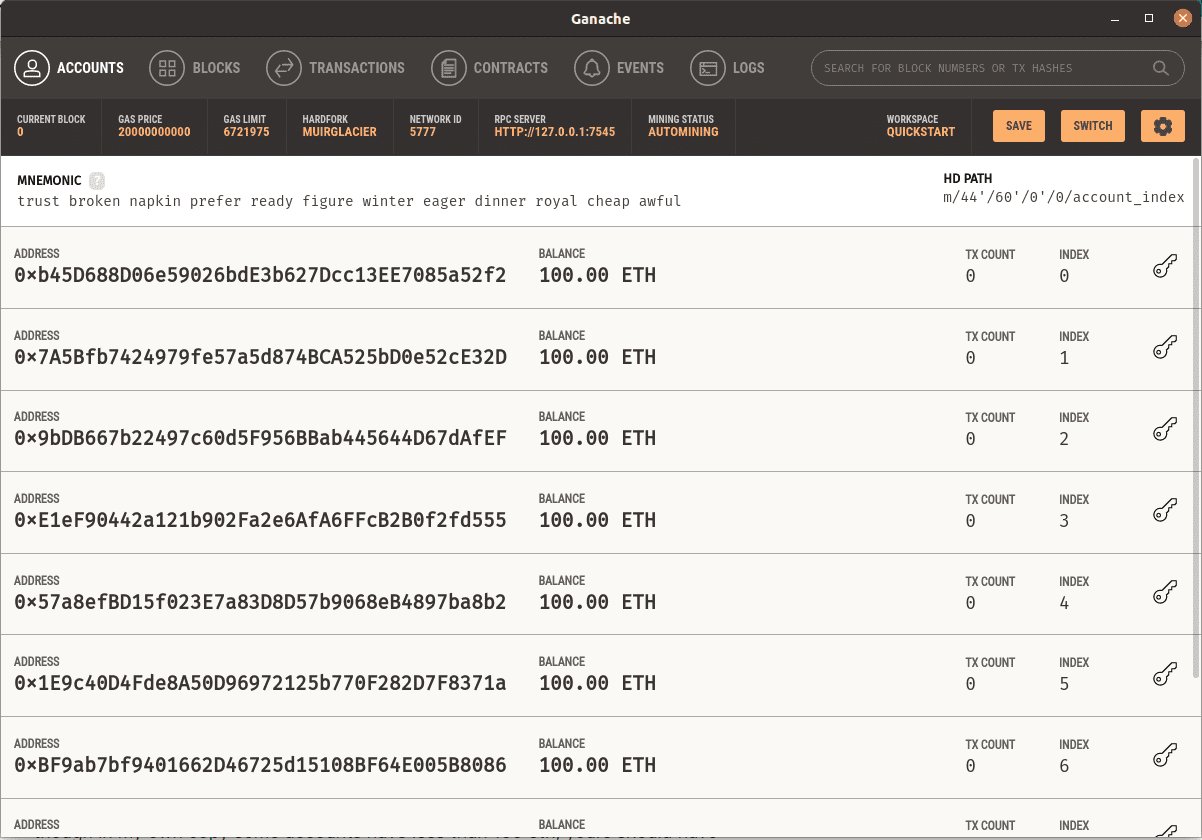
As seen above, 10 different accounts are generated for you by Ganache each with 100 ETH. On the right most side of each account, there is a ‘key’ icon which when clicked will show your private key for the that account and can be used to import the account to different networks. This will be shown later.
Let’s start. Choose a location on your system and let’s create a folder like what we have below
$ mkdir election
$ cd election
$ git clone https://github.com/internetmango/web3-sample-app .
Open this directory in the IDE of your preference. I’m using VS Code here.
Let’s go through the structure of the app:
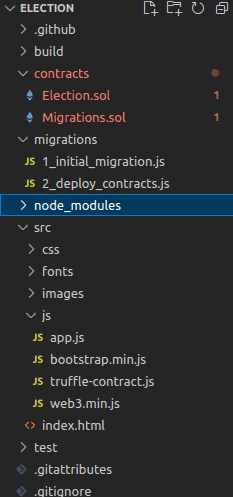
contracts directory: This is where we keep all of our Smart Contracts.
migrations directory: This is where all of the migration files live. If you have developed in other frameworks that have ORMs, you will notice that this is something familiar. Whenever we deploy smart contracts to the blockchain, we are updating the Blockchain’s state, and hence need a migration.
node_modules directory: This is the home of all of our Node dependencies.
src directory: The source files our client-side application.
test directory: Tests for our smart contracts.
truffle-config.js file: This is the main configuration file for our Truffle project
Let’s check the Smart Contracts first:
Election.sol
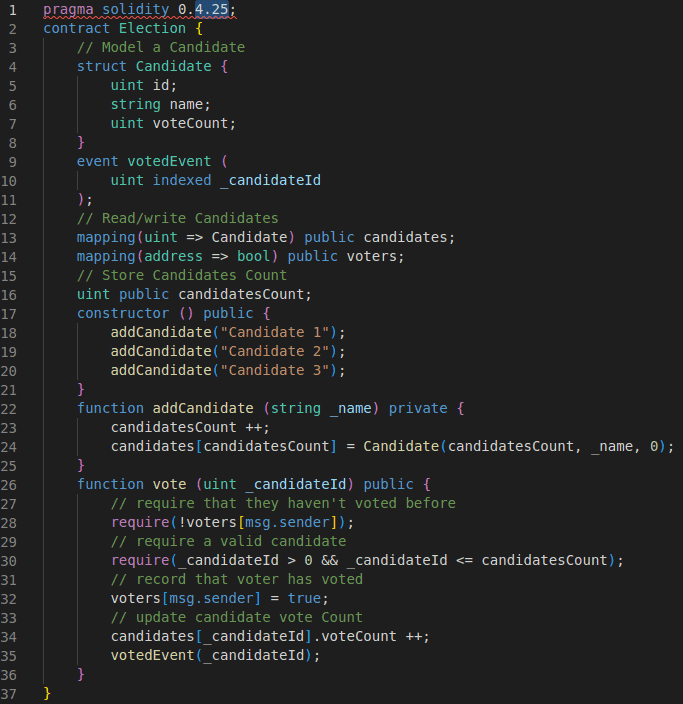
Here you can see that a contract is like a class in OOP. It can have any number of properties( and methods.
The first line declares the version of Solidity you wish you write your code in. This should be done first in all Solidity smart contracts. The declaration of the smart contract is started with the keyword contract just like in OOP, where you start a class with the keyword class.
We need to store more properties of our candidate like id, name, number of votes and we need a way to store more than one candidate. So we will use the struct type to achieve this. This is similar to the struct in the C language. That’s what you see from lines 4 to 8.
We can store key-value pairs like object properties and their values in the type mapping. Mapping is like an associative array or hash with key-value pairing allowed. You can see the mappings we have used in lines 13 and 14.
You can view more types in the documentation of the version of Solidity we are using here.
In line #16, we are declaring an unsigned integer variable candidatesCount as public. In other backend languages like c# or java, the public keyword will come before string. Also in solidity declaring the variable candidatesCount public will generate a free getter function from solidity.
Next is the contructor function, this function gets called whenever the smart contract is deployed to the Blockchain. If you are new to OOP programming, a constructor is the function which gets called when a class is instantiated so that you can initialize variables and objects within the instantiated object.
In the above screenshot, you can see that the function addCandidate is called three times with different names as arguments in the constructor so that three candidates get added to our app at the time of deployment. You can see the definition of addCandidate in lines 22 to 25.
Another function vote is defined in lines 26 to 36 which is used to record the votes done by users into the Blockchain. This function is called from the frontend javascript with the help of web3.js(explained below) .
Next, we want to deploy our contract to the blockchain, but first, we need to create a migration file for it. In the migrations folder, you can see two files – the first one for migrating the Migrations contract and the second for migrating the Election contract. Migrations will be deployed in the order of their filename alphabetically.
Now, running the below command will execute the migrations and deploy the contracts to the Blockchain:
$ truffle migrate --resetAfter the migration is completed, we can interact with our deployed Smart Contract like below. In the terminal type:
$ truffle consoleYou should see a console with the prompt like this:
$ truffle<development>:Then type the command below or copy and paste:
$ Election.deployed().then(function(instance) {app=instance})Election is the name of the contract we created earlier and we retrieved a deployed instance of the contract with the deployed() function and assigned it to a variable app inside the promise’s callback function.
After entering the above code you should see $ undefined this should not worry you as it just means the process is done. However, we now have a variable app that can be used to call any property in the contract, for eg., candidatesCount like this.
$ app.candidatesCount()If it’s a variable of mapping type, for example, candidates, you can retrieve individual candidates by passing the index of that candidate as an argument to the function call like below:
$ app.candidates(2)Now that we have deployed the smart contract, let’s move on to set up our frontend/client-side web app.
Frontend/Client Application
Let’s look at the file src/js/app.js
App = {
 web3Provider: null,
 contracts: {},
 account: "0x0",
 init: function () {
   return App.initWeb3();
 },
 initWeb3: function () {
   if (typeof web3 !== "undefined") {
     // If a web3 instance is already provided by Meta Mask.
     App.web3Provider = web3.currentProvider;
     web3 = new Web3(web3.currentProvider);
   } else {
     // Specify default instance if no web3 instance provided
     App.web3Provider = new Web3.providers.HttpProvider(
       "http://localhost:7545"
     );
     web3 = new Web3(App.web3Provider);
   }
   return App.initContract();
 },
 initContract: function () {
   $.getJSON("Election.json", function (election) {
     // Instantiate a new truffle contract from the artifact
     App.contracts.Election = TruffleContract(election);
     // Connect provider to interact with contract
     App.contracts.Election.setProvider(App.web3Provider);
     App.listenForEvents();
     return App.render();
   });
 },
 render: function () {
   var electionInstance;
   var loader = $("#loader");
   var content = $("#content");
   loader.show();
   content.hide();
   // Load account data
   if (window.ethereum) {
     ethereum.enable().then(function (acc) {
       App.account = acc[0];
       $("#accountAddress").html("Your Account: " + App.account);
     });
   } else
     web3.eth.getCoinbase(function (err, account) {
       if (err === null) {
         App.account = account;
         $("#accountAddress").html("Your Account: " + account);
       }
     });
   // Load contract data
   App.contracts.Election.deployed()
     .then(function (instance) {
       electionInstance = instance;
       return electionInstance.candidatesCount();
     })
     .then(function (candidatesCount) {
       var candidatesResults = $("#candidatesResults");
       candidatesResults.empty();
       var candidatesSelect = $("#candidatesSelect");
       candidatesSelect.empty();
       for (var i = 1; i <= candidatesCount; i++) {
         electionInstance.candidates(i).then(function (candidate) {
           var id = candidate[0];
           var name = candidate[1];
           var voteCount = candidate[2];
           // Render candidate Result
           var candidateTemplate =
             "<tr><th>" +
             id +
             "</th><td>" +
             name +
             "</td><td>" +
             voteCount +
             "</td></tr>";
           candidatesResults.append(candidateTemplate);
           var candidateOption =
             "<option value='" + id + "' >" + name + "</ option>";
           candidatesSelect.append(candidateOption);
         });
       }
       return App.account ? electionInstance.voters(App.account) : false;
     })
     .then(function (hasVoted) {
       // Do not allow a user to vote
       if (hasVoted) {
         $("form").hide();
       }
       loader.hide();
       content.show();
     })
     .catch(function (error) {
       console.log("error", error);
     });
 },
 castVote: function () {
   var candidateId = $("#candidatesSelect").val();
   App.contracts.Election.deployed()
     .then(function (instance) {
       return instance.vote(candidateId, { from: App.account });
     })
     .then(function (result) {
       // Wait for votes to update
       console.log("result", result);
       //location.reload();
     })
     .catch(function (err) {
       console.error(err);
     });
 },
 listenForEvents: function () {
   App.contracts.Election.deployed().then(function (instance) {
     instance
       .votedEvent(
         {},
         {
           fromBlock: 0,
           toBlock: "latest",
         }
       )
       .watch(function (error, event) {
         console.log("event triggered", event);
         // Reload when a new vote is recorded
         App.render();
       });
   });
 },
};
$(function () {
 $(window).load(function () {
   App.init();
 });
});
Let’s take note of a few things that the App.js code does:
- Set up web3: web3.js is a javascript library that allows our client-side application to talk to the blockchain. We configure web3 inside the “initWeb3” function.
- Initialize contracts: We fetch the deployed instance of the smart contract inside this function and assign some values that will allow us to interact with it.
- Render function: The render function lays out all the content on the page with data from the smart contract. At this point we are only listing the candidates that were created in the smart contract and rendering them in a table. We also fetch the current account that is connected to the blockchain inside this function and display it on the page.
For the HTML part, it’s a simple HTML webpage that is self-explanatory.
Now let’s view the client-side application in the browser. First, make sure that you’ve migrated your contracts like this:
$ truffle migrate --resetNext, start your development server from the command line like this:
$ npm run devThis should automatically open a new browser window with your client-side application.
Make sure your local Blockchain is running in Ganache. If yours is not running make sure that the port number in Ganache is the same with the port number in the truffle-config.js file.
Also, make sure that you are logged in to MetaMask and import one or two accounts from the Ganache’s set of accounts into MetaMask.
Importing an account into MetaMask:
- Step 1: In your running Ganache app pick one of the accounts you wish to import and click on the key on the rightmost side.
- Step 2: Open MetaMask in your browser. Log in if you have not.
- Step 3: Select a localhost network out of the different networks you see available there (localhost:8545)
- Step 4: Click on the icon on the top right corner and select import account.
- Step 5: Paste the private key there and your account has been successfully imported.
Once that is done when you refresh the application you should see this:
Step 3: Voting
In Election.sol, from lines 26 to 36, as discussed above, you can see the function vote which is used to mark the votes of the Users:
function vote (uint _candidateId) public {
       // require that they haven't voted before
       require(!voters[msg.sender]);
       // require a valid candidate
       require(_candidateId > 0 && _candidateId <= candidatesCount);
       // record that voter has voted
       voters[msg.sender] = true;
       // update candidate vote Count
       candidates[_candidateId].voteCount ++;
       votedEvent(_candidateId);
}
We have already created a mapping variable named votes in Election.sol like below:
mapping(address => bool) public voters;
The core functionality of this function is to increase the candidate’s vote count by reading the Candidate struct out of the candidates mapping and increasing the voteCount by 1 with the increment operator (++). Let’s look at a few other things that this function does:
- It accepts one argument. This is an unsigned integer with the candidate’s id.
- Its visibility is public because we want an external account to call it.
- It adds the account that voted to the voters mapping that we just created. This will allow us to keep track that the voter has voted in the election. We access the account that’s calling this function with the global variable msg.sender provided by Solidity.
- It implements require statements that will stop execution if the conditions are not met. First require that the voter hasn’t voted before. We do this by reading the account address with msg.sender from the mapping. If it’s there, the account has already voted. Next, it requires that the candidate id is valid. The candidate id must be greater than zero and less than or equal to the total candidate count.
Frontend for voting
You can see a form that allows accounts to vote below the table in the file index.html:
<form onSubmit="App.castVote(); return false;">
 <div class="form-group">
 <label for="candidatesSelect">Select Candidate</label>
 <select class="form-control" id="candidatesSelect">
 </select>
 </div>
 <button type="submit" class="btn btn-primary">Vote</button>
 <hr />
</form>
Let’s examine a few things about this form:
- The form is created with an empty select element.
- The select options are populated with the candidates provided by our smart contract in the file app.js.
- The form has an “onSubmit” handler that will call the “castVote” function which is defined in the file app.js
castVote: function () {
   var candidateId = $("#candidatesSelect").val();
   App.contracts.Election.deployed()
     .then(function (instance) {
       return instance.vote(candidateId, { from: App.account });
     })
     .then(function (result) {
       // Wait for votes to update
       console.log("result", result);
       //location.reload();
     })
     .catch(function (err) {
       console.error(err);
     });
 }
First, we query the contract for the candidateId in the form. When we call the vote function from our smart contract, we pass in this id, and we provide the current account with the function’s “from” metadata. This will be an asynchronous call. When it is finished, we’ll show the loader and hide the page content. Whenever the vote is recorded, we’ll do the opposite, showing the content to the user again.
Go ahead and try the voting function. Once you do, you should see a Metamask confirmation pop-up.
Depending on your system it may open a new tab instead of a new pop-up window.
Once you click submit, you’ve successfully casted a vote! You’ll still see a loading screen. For now, you’ll have to refresh the page to see the votes recorded. We’ll implement the functionality update the loader automatically in the next section.
Step 4: Watch Events
The thing we want to add to our application is disable the submit button whenever a vote is cast. We do this by triggering an event. This will allow us to update our client-side application when an account has voted. We will start by declaring an event in our contract like this:
contract Election {
// ...
event votedEvent (
uint indexed _candidateId
);
// ...
}
Now, we can trigger this “votedEvent” event inside our “vote” function like this:
function vote (uint _candidateId) public {
    // require that they haven't voted before
    require(!voters[msg.sender]);
    // require a valid candidate
    require(_candidateId > 0 && _candidateId <= candidatesCount);
    // record that voter has voted
    voters[msg.sender] = true;
    // update candidate vote Count
    candidates[_candidateId].voteCount ++;
    // trigger voted event
    votedEvent(_candidateId);
}
Now that we’ve updated our contract, we must run our migrations:
$ truffle migrate --resetNow we have to update the client-side application. We want to make sure that the application listens for the voted event and fires a page refresh any time that it is triggered. We can do that with a listenForEvents function as defined in the app.js:
listenForEvents: function () {
   App.contracts.Election.deployed().then(function (instance) {
     instance
       .votedEvent(
         {},
         {
           fromBlock: 0,
           toBlock: "latest",
         }
       )
       .watch(function (error, event) {
         console.log("event triggered", event);
         // Reload when a new vote is recorded
         App.render();
       });
   });
 }
This function does a few things. First, we subscribe to the voted event by calling the “votedEvent” function. We pass in some metadata that tells us to listen to all events on the blockchain. Then we “watch” this event. Inside here, we log to the console anytime a “votedEvent” is triggered. We also re-render all the content on the page. This will get rid of the loader after the vote has been recorded, and show the updated vote count on the table.
Finally, we can call this function whenever we initialize the contract:
initContract: function () {
   $.getJSON("Election.json", function (election) {
     // Instantiate a new truffle contract from the artifact
     App.contracts.Election = TruffleContract(election);
     // Connect provider to interact with contract
     App.contracts.Election.setProvider(App.web3Provider);
     App.listenForEvents();
     return App.render();
   });
 }
Now, you can vote on your client-side application, and watch the votes recorded in real time! Be patient, it might take a few seconds for the event to trigger. If you don’t see an event, try restarting Chrome. There is a known issue with Metamask surrounding events. Restarting Chrome always fixes it for me.
And there you have it. We have successfully built a full-stack decentralized application on the Ethereum blockchain!