- November 10, 2022
- Posted by: Yadu Dev
- Categories: Engineering, Uncategorized

Server-side
Generate model schema
controlIf you have given the required content- types at the time of plugin generation, then it will usually be in the server/content-types/setting/schema.json, if the file is empty then paste the below code there.
JAVASCRIPT

// path: ./strapi-plugin-abandoned-cart/server/content-types/setting/schema.json


{
"kind": "collectionType",
"collectionName": "settings",
"info": {
"singularName": "setting",
"pluralName": "settings",
"displayName": "settings"
 },
"options": {
"draftAndPublish": true,
"comment": ""
 },
"attributes": {
"cart_item_table": {
"type": "string"
   },
"product_image_field": {
"type": "string"
   },
"product_title_field": {
"type": "string"
   },
"product_quantity_field": {
"type": "string"
   },
"duration": {
"type": "biginteger"
   },
"user_email_field": {
"type": "string"
   },
"api_token": {
"type": "text"
   },
"cron": {
"type": "boolean"
   }
 }
}
Routes
Requests sent to Strapi on any URL are handled by routes. By default, Strapi generates routes for all the content-types (see REST API documentation). Routes can be added and configured
JAVASCRIPT

// path: ./strapi-plugin-abandoned-cart/server/content-types/setting/schema.json

module.exports = [  {
method: "GET",
path: "/settings",
handler: "settingsController.getSettings",
config: {
policies: [],
   },
 },
 {
method: "PUT",
path: "/settings/update",
handler: "settingsController.settingsUpdate",
config: {
policies: [],
   },
 }
];
Let’s take the first Route,As you can see here, my path is /send-email, the action is sendEmail and is owned by the controller abandonedCartController. Then we can give auth: false inside config: {} to specify that this route does not require authentication and it is true by default ,so here didnt give anything.
Okay.. Now we have done with the Routes. next, we need to create these controllers with the corresponding actions.
Controllers
Now it’s time to retrieve our Content-Types and return them in response to our action. You can write this logic directly in your controller actions but know that you can use services to write your functions.
settings-controller
JAVASCRIPT

// path: ./strapi-plugin-abandoned-cart/server/controllers/settings-controller.js

'use strict'

module.exports = {
async settingsUpdate (ctx) {
try {
return await strapi.plugin("strapi-plugin-abandoned-cart").service('settings').settingsUpdate(ctx.request.body)
       } catch (error) {
ctx.throw(500,error)
       }
   },
async getSettings (ctx) {
try {
return await strapi.plugin("strapi-plugin-abandoned-cart").service('settings').getSettings()
       } catch (error) {
ctx.throw(500,error)
       }
   },
}
Index.js
Add or modify the import of these controllers in the ./server/controllers/index.js file with the following:
JAVASCRIPT

// path: ./strapi-plugin-abandoned-cart/server/controllers/index.js

"use strict";

const settingsController = require("./settings-controller");

module.exports = {
settingsController
};
Services
Services are a set of reusable functions. They are particularly useful to respect the “don’t repeat yourself” (DRY) programming concept and to simplify controllers’ logic.
Abandoned-cart
In this action we are sending emails to the users who have abandoned carts.
JAVASCRIPT

// path: ./strapi-plugin-abandoned-cart/server/services/abandoned-cart.js

'use strict'

const userItemObject = require("../helper/customFunctios")

module.exports = ({ strapi}) => ({
async sendEmail(cartItems) {
let restructuredCartItems = []
cartItems?.map((cart_item) => {
let temp = {}
let product = cart_item?.product
let user = cart_item?.user
temp['userEmail'] = user?.email
temp['product'] = product
temp['id'] = cart_item?.id
temp['quantity'] = cart_item?.quantity
temp['lastUpdated'] = cart_item?.updatedAt
restructuredCartItems.push(temp)
       })
let object = userItemObject(restructuredCartItems)
try {
Object.keys(object).map(async (key) => {
const emailOptions = {
subject: 'This is a test',
text: "test",
html: `<h1>Welcome!</h1><p>This is a test HTML email.</p>`,
}
await strapi.plugins["email"].services.email.sendTemplatedEmail({
to: key,
from: "admin@example.com",
emailOptions)})} catch(error) {
console.log(error)}
return object
    },
   })

Settings
Now we will simply retrieve our ContentTypes via the strapi object which is accessible to us from the back-end part of our plugin.
Here we are using strapi’s Entity Service API.With the Entity Service API, components and dynamic zones can be created and updated while creating or updating entries.Please check the Entity Service API for more information.
In ‘plugin::strapi-plugin-abandoned-cart.setting’ the strapi-plugin-abandoned-cart is the plugin name and setting’ is the content-type name of the plugin.
JAVASCRIPT

// path: ./strapi-plugin-abandoned-cart/server/services/settings.js

'use strict'

module.exports = ({ strapi}) => ({
async settingsUpdate(cartItems) {
try {
let entry = {}
const entries = await strapi.entityService.findMany('plugin::strapi-plugin-abandoned-cart.setting', {
sort: 'id'});
let id = entries[0]?.id
if(entries?.length > 0) {
entry = await strapi.entityService.update('plugin::strapi-plugin-abandoned-cart.setting',id, {data: cartItems});
 } else {
entry = await strapi.entityService.create('plugin::strapi-plugin-abandoned-cart.setting', {data: cartItems});
}
return entry
} catch(error) {
console.log(error)
       }
   },
async getSettings(cartItems) {
try {
const settings = await strapi.entityService.findMany('plugin::strapi-plugin-abandoned-cart.setting', {
sort: 'id'});
return settings
} catch(error) {
console.log(error)
       }
   },
})
Index.js
Do exactly the same thing for your service which we have done in controllers/index.js. Add or modify the import in the file at the root:
JAVASCRIPT

// path: ./strapi-plugin-abandoned-cart/server/services/index.js

"use strict";

const abandonedCart = require("./abandoned-cart");
const settings = require("./settings");

module.exports = {
abandonedCart,
settings
};
Helper
JAVASCRIPT

// path: ./strapi-plugin-abandoned-cart/server/helper/customFunctios.js

function userItemObject(cartItems) {
let object = {}
cartItems.map((cart_item) => {
let temp = {}
let email = cart_item?.userEmail
let product = cart_item?.product
temp['product'] = product
temp['id'] = cart_item?.id
temp['quantity'] = cart_item?.quantity
object[email] ?  object[email].push(temp) : object[email] = [temp]
   })
return object
}
module.exports = userItemObject
Other Configuration
1.Email Config
The Email plugin enables applications to send emails from a server or an external provider. The Email plugin uses the Strapi global API, meaning it can be called from anywhere inside a Strapi application. The Email plugin requires a provider and a provider configuration in the plugins.js file. 1. Install strapi-provider-email-nodemailer .
npm i strapi-provider-email-nodemailer2. Enable the email plugin in /config/plugins.js .
module.exports = {

  // ...
  'email': {config: {
        provider: "nodemailer",
        providerOptions: {
          host: ' smtp.gmail.com',
          port: 587,
          secure: true,
          auth: {
            user: 'example@gmail.com',
            pass: '**************',
          },
        }
      }},
  // ...
}
3. Customized email template.
In server/services/abandoned-cart.js, You can paste your custom HTML email template inside emailOptions.
const emailOptions = {
                    subject: 'This is a test',
                    text: "test",
                    html: "Paste your html for e-mail template. ",
                  }
Setup Cron job
1. To define a cron job, create a file ./config/cron-tasks.js.
// config/functions/cron.js

'use strict';

/**

* Cron config that gives you an opportunity

* to run scheduled jobs.

*

* The cron format consists of:

* [SECOND (optional)] [MINUTE] [HOUR] [DAY OF MONTH] [MONTH OF YEAR] [DAY OF WEEK]

*

* See more details here: https://strapi.io/documentation/v3.x/concepts/configurations.html#cron-tasks

*/

module.exports = {

[process.env.SEND_EMAIL_CRON||"00 10 */3 * *"]:async() => {

letactive

constallSettings = awaitstrapi.entityService.findMany('plugin::strapi-plugin-abandoned-cart.setting', {

sort:'id',

});

letsettings = allSettings[0]

if(allSettings.length > 0) {

active = settings?.cron

}

if (active) {

letcart_item_table = settings?.cart_item_table || 'cart-item'

letdays = settings?.duration || 5

varCurrentDate=newDate();

CurrentDate.setHours(0, 0, 0, 0);

varpastDate=newDate(CurrentDate);

pastDate.setDate(pastDate.getDate() - days)

constcartItems = awaitstrapi.entityService.findMany(`api::cart-item.${cart_item_table}`, {

sort:'id',

filters: {

updatedAt: {

$lt:pastDate,

},

},

populate: ['user', 'product', 'product.image'],

});

awaitstrapi.plugin("strapi-plugin-abandoned-cart").service('abandonedCart').sendEmail(cartItems)

} else {

returntrue

}

}

};
2. Enabling cron jobs.
To enable cron jobs, set cron.enabled to true in the server configuration file and declare the jobs:
const cronTasks = require("./functions/cron")
module.exports = ({ env }) => ({
  host: env('HOST', '0.0.0.0'),
  port: env.int('PORT', 1337),
  app: {
    keys: env.array('APP_KEYS'),
  },
  cron: { enabled: true,
    tasks: cronTasks, },
});
3. Set cron job in .env file.
SEND_EMAIL_CRON=0 0 1 * * 1
Set AuthToken
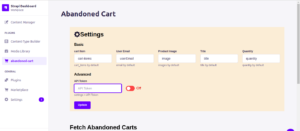
From the strapi admin UI, go to Settings > API Tokens and then create one with Token type: full access
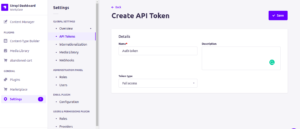
Then come to the abandoned-cart plugin UI, and paste it on the API Token field then click update
Now we have configured the plugin to use with our Strapi app. You can now run yarn develop –watch-admin to start the server and go to
http://localhost:8000/admin to see it working.